Fixing Rust on Steel Mounting Frames: Field Repair
This guide outlines how to identify, remove, and treat rust on existing steel racking. It covers assessment methods, repair steps, and coating practices to prevent further degradation of the mounting structure.
- Visible rust on steel racking requires immediate assessment to determine structural integrity before attempting repair.
- Surface rust can often be removed with mechanical abrasion, but pitting or flaking often demands more extensive intervention.
- Proper cleaning and application of compatible coatings are required to restore solar corrosion protection to treated areas.
- Regular inspection schedules help identify early signs of coating failure before they compromise the mounting structure.
- Matching new materials to existing systems is critical to avoid galvanic issues and ensure long-term performance.
What to look for during a visual inspection
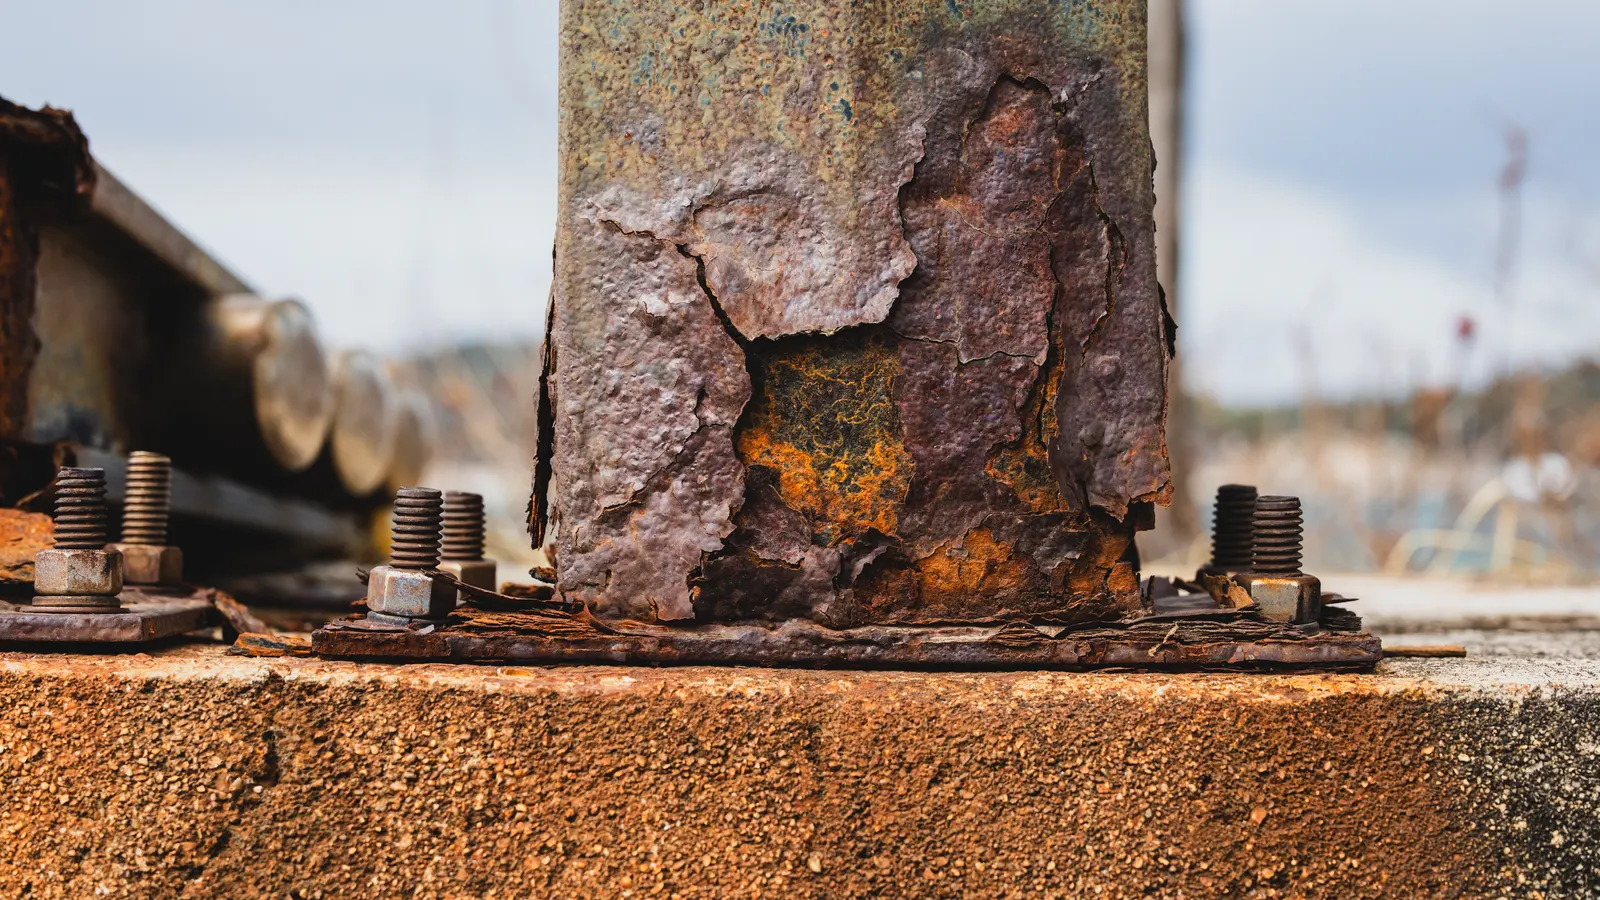
Start with a systematic walk of the racking structure. Look at the base plates, the main rails, the string clamps, and the attachment points to the roof or ground. Pay attention to the underside of the rails and the areas where fasteners penetrate the steel. These spots trap moisture and accelerate rust.
Begin your inspection at the ground level if the system is ground-mounted. Check the base plates where the ground screws or bolts anchor the structure. If the soil is uneven, water may collect in the gaps between the base plate and the ground. This standing water attacks the steel from below, often long before it appears on the visible top surface. Use a flashlight to examine the underside of the rails. UV light fades the top coat, but shadowed areas under rails and behind clamp blocks remain dark and wet. This lack of airflow allows moisture to linger. If the paint in these shadowed zones feels rough or powdery, the coating has failed.
Check the paint or coating condition first. Fading is a sign of UV exposure, but bubbling or peeling paint is a sign that moisture has gotten underneath. If you see white or grey powdery residue on the steel, it is usually oxidation. This powder can be removed with a wire brush, but it indicates the coating is failing. Look specifically at the welds. Factory welds often have a different surface texture than the painted body of the rail. The welds may have been stripped of their factory coating during the welding process and then recoated. If the recoat was thin or applied incorrectly, these joints are prime candidates for early failure.
Pay close attention to the edges of cut steel. If the racking has been modified or cut during installation, the factory coating may have been stripped. These raw edges are the most likely place for new rust to start. They are also where moisture collects if the geometry allows water to pool. Inspect the ends of the rails where they terminate. If the installation team cut the rail length to fit the roof pitch, the cut end is vulnerable. A simple visual check for orange staining at these cut ends can reveal hidden damage that a quick glance might miss.
Common symptoms and likely causes
The symptoms of corrosion vary depending on the severity of the damage and the environment where the system is installed. Coastal areas, for example, will see faster degradation than inland sites. The table below summarizes the most common issues field technicians encounter.
| Symptom | Likely cause | What to do |
|---|---|---|
| Fine orange-brown spots on painted surface | Early stage oxidation, likely from trapped moisture | Clean the area, apply primer, and touch up the topcoat |
| Flaking paint with rough texture underneath | Coating failure, possibly from impact or poor application | Remove loose paint, sand back to bare metal, and recoat |
| Deep pitting or holes in the steel | Advanced corrosion, often from long-term exposure or damage | Assess structural integrity, replace damaged members if weak |
| White or grey powder on joints | Galvanic corrosion or oxidation of zinc coating | Clean the joint, check for dissimilar metals, and apply sealant |
| Rust streaks running down from a fastener | Trapped water at the bolt head or nut | Re-torque the fastener, apply a dab of sealant, and clean the area |
When interpreting these symptoms, context matters. A fine orange spot on a coastal roof may be normal wear after a few years, while the same spot on an inland site might indicate a serious coating defect. Look for the pattern. If rust streaks run down from a fastener, the source is usually water trapped in the thread hole. If the rust is uniform across a large panel, it is more likely a general environmental exposure issue rather than a specific mechanical fault. Do not ignore white residue on joints. This is often the result of galvanic action between dissimilar metals. If aluminum clamps are touching steel rails without a barrier, this white powder will appear quickly. It is a warning sign that the galvanic couple is accelerating corrosion.
Assessing structural integrity before repair
Do not proceed with cosmetic repair if the steel is structurally compromised. Tap the rusted area with a small hammer or a screwdriver handle. A solid ring indicates the metal is still intact. A dull thud or a hollow sound suggests the cross-section is reduced.
Measure the thickness if possible. A simple caliper can give you an idea of how much material is left. If the steel has lost more than a significant portion of its original thickness, the member may no longer support the load. In this case, the frame member needs replacement, not just coating. Use the caliper to measure the web of the C-channel rail at the point of maximum rust. Compare this measurement to a new rail of the same profile. If the remaining metal is significantly thinner, the rail has lost its load-bearing capacity. Even if the paint looks fine on the outside, the internal structure may be hollow.
Check the connections. Rust at the bolt holes can weaken the joint. Ensure the bolts are still holding tight. If the threads are heavily corroded, the joint may have lost its mechanical grip. This is a safety issue that takes priority over aesthetics. Inspect the washers as well. If the rubber or plastic washers have degraded, they may no longer provide the necessary gap or seal. Replace any degraded washers with new ones of the correct material. If the bolt threads are stripped or heavily pitted, the joint cannot be trusted to hold the load. In this case, the bolt and nut must be replaced, and the hole may need to be tapped or the member replaced entirely.
Step-by-step repair process
Once you have determined the extent of the damage, proceed with the repair. The goal is to restore a protective barrier between the steel and the environment.
- Remove all loose rust and flaking paint. Use a wire brush, a flap disc, or sandpaper. The surface must be smooth and free of dust before you can apply any primer. Do not skip this step. Applying primer over loose rust or paint will only lead to early failure. The primer will not bond to the rust, and the loose paint will continue to flake off, taking the new coating with it.
- Clean the area with a degreaser or a solvent wipe. Oil and grease will prevent the primer from bonding to the metal. Even a thin film of oil from a mechanic’s hands can ruin a repair. Wipe the area thoroughly until it feels clean to the touch.
- Apply a rust-inhibitive primer. This type of primer contains chemicals that stop the corrosion process while the topcoat is drying. Follow the manufacturer’s instructions for drying time. Do not apply the topcoat before the primer is fully cured. Rushing this step can trap moisture under the paint and cause blistering later.
- Apply the topcoat. Use a paint that is compatible with the primer and rated for outdoor, UV exposure. Two thin coats are usually better than one thick coat. Thick coats dry slowly and are more prone to cracking and peeling. Let each coat dry completely before applying the next.
- Seal any fasteners. Apply a small amount of silicone or polyurethane sealant around bolts and nuts where they penetrate the steel. This prevents water from getting into the threads. Do not use too much sealant. A small dab is sufficient. Excess sealant can trap moisture and heat, which may cause the paint to blister.
Matching materials and avoiding galvanic issues
If you need to replace a rusted member, pay attention to the material specification. If the original racking is coated steel, use coated steel for the replacement. If you use bare steel, it will rust much faster than the surrounding structure.
Be careful when mixing materials. If you attach aluminum clamps or brackets to the steel frame without a barrier, you create a galvanic couple. This can accelerate the corrosion of the steel, especially in the presence of moisture. Use plastic or rubber washers or gaskets between dissimilar metals to prevent direct contact. Check existing clamps for signs of galvanic corrosion. If you see white powder at the contact points, the barrier has failed. Replace the clamp with one that has a proper plastic liner or install a new gasket.
Review the original specifications for the system. If the racking is hot-dip galvanized, use zinc-compatible primers and coatings. Mixing incompatible coatings can lead to delamination and early failure. When in doubt, consult the manufacturer’s technical documentation for approved repair materials. Do not assume that any outdoor paint is suitable for galvanized steel. Standard primers may react with the zinc coating and cause it to lift. Use a primer specifically formulated for galvanized surfaces.
Long-term maintenance and prevention
Repairing visible rust is a temporary fix if the underlying cause is not addressed. The environment will continue to attack the steel. Regular maintenance is the best way to extend the life of the structure.
Schedule inspections at least once a year. Look for new signs of coating failure, especially after severe weather events. Heavy rain or wind can knock debris onto the racking and cause physical damage. Inspect the system after major storms. Wind-driven rain can force water into joints that were previously sealed. A quick visual check can identify new leaks or damaged seals before they become serious problems.
Keep the area around the base plates clear of vegetation. Leaves and dirt trap moisture against the steel. Clearing this debris improves air circulation and reduces the risk of corrosion at the ground level. Use a broom or a low-pressure water jet to remove debris from the base plates. Do not use high-pressure water on the coating, as it can damage the paint film. A gentle wash is sufficient to remove dirt without causing harm.
Address small issues immediately. A tiny spot of rust can become a hole if ignored. Touching up a small area with primer and paint is a quick task that saves the cost of a major repair later. Keep a small kit of primer and paint on site. This allows you to perform immediate touch-ups when you spot new rust during an inspection. Delaying these small repairs is the most common cause of major corrosion issues.
When to call a professional
Some repairs go beyond the scope of a standard field service. If the corrosion has spread across multiple members, or if the structure is on a complex roof system, professional assessment is required.
Engineers can perform load calculations to determine if the remaining steel is sufficient. They can also recommend structural reinforcements if the original design has been compromised by damage or age. If you are unsure about the structural integrity of a member, do not attempt a DIY repair. A professional inspection can provide peace of mind and ensure the system remains safe.
For large commercial or utility-scale projects, document all repairs with photos and reports. This creates a maintenance record that is useful for future inspections and warranty claims. It also helps in planning long-term capital expenditures for replacement. Take photos of the area before and after the repair. Include the date and the location of the repair in the documentation. This record is valuable when negotiating with manufacturers or insurers.
Frequently asked questions
Can I paint over rust without removing it?
No. Painting over rust traps moisture against the steel, which accelerates the corrosion process. You must remove all loose rust and clean the surface before applying primer.
What is the difference between surface rust and structural rust?
Surface rust is a thin layer of oxidation that can be removed with abrasion. Structural rust indicates that the metal itself is being consumed, which reduces the strength of the member and may require replacement.
How often should I inspect solar racking for corrosion?
Annual inspections are a good baseline. Increase the frequency if the system is in a harsh environment, such as a coastal area or an industrial zone with high salt or chemical exposure.
Is it safe to use standard household paint for racking repair?
No. Standard household paint is not designed for the UV exposure and temperature fluctuations of outdoor solar applications. Use industrial-grade coatings that are rated for metal and outdoor use.
Do I need to match the original coating color?
Color matching is not required for performance, but it helps with visual identification of repaired areas during future inspections. Use a primer and topcoat that are compatible with the existing coating system.